Punch Needle Finishing "TRICK and TREAT"...

A Punch Needle Finishing "Trick" (Tip) from Rose Clay at ThreeSheepStudio.com

There are many ways to 'finish' 
a Punch Needle project.  

To learn a 'TRICK' 
that will become a 'TREAT'...
read on...


Some ways to 'Finish' your
punch needle project...


A Punch Needle Finishing "Trick" (Tip) from Rose Clay at ThreeSheepStudio.com

A Pillow...


A Punch Needle Finishing "Trick" (Tip) from Rose Clay at ThreeSheepStudio.com

A Pincushion...


A Punch Needle Finishing "Trick" (Tip) from Rose Clay at ThreeSheepStudio.com

On a book...


A Punch Needle Finishing "Trick" (Tip) from Rose Clay at ThreeSheepStudio.com

On a bag...


A Punch Needle Finishing "Trick" (Tip) from Rose Clay at ThreeSheepStudio.com

On a hornbook...


A Punch Needle Finishing "Trick" (Tip) from Rose Clay at ThreeSheepStudio.com

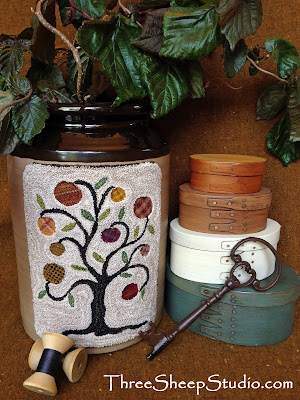
On a crock...


A Punch Needle Finishing "Trick" (Tip) from Rose Clay at ThreeSheepStudio.com

All of these applications 
have one thing in common...
When you turn under the Weavers Cloth...
you DON'T want to see any Weavers Cloth 
'peeking' out on the sides.

I have seen people resort to all sorts of 
tactics to 'cover up' that 'peeking' Weavers Cloth.

!! PUT THAT BLACK SHARPIE AWAY !!
There is a better (*easy*) way.


A Punch Needle Finishing "Trick" (Tip) from Rose Clay at ThreeSheepStudio.com

After you complete the punching...
lay project face down on a thick towel,
cover with a damp cloth 
and press with a hot iron.  
Trim Weavers Cloth to approximately 
1 inch or so on all four sides.
Fold Weavers Cloth under, corners first,
 and then sides, (to the back of piece), 
pressing each time with a hot iron.
Starting with the corners, spread a thin layer of fabric adhesive 
on underside of each corner. 
Fold under the Weavers Cloth to the back
and press in place.
Repeat this process with all four sides.
Allow to dry.

(I use Elmers Craft Bond Paper and Fabric glue.  
It is acid free, dries clear and remains flexible.)

Now, here is the 'TRICK'...


A Punch Needle Finishing "Trick" (Tip) from Rose Clay at ThreeSheepStudio.com

When you iron AND fold the Weavers Cloth
to the back, always do so 
"NEATLY AND SNUGLY".


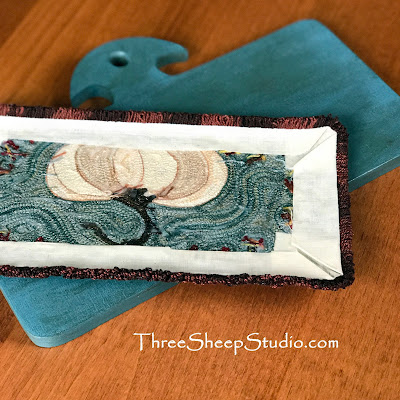
A Punch Needle Finishing "Trick" (Tip) from Rose Clay at ThreeSheepStudio.com

(See how the edges slightly curl up ??)

As you can see from the picture,
the Weavers Cloth needs to be pulled 
snugly enough, that the punch needle piece
 will not be laying 'flat'.


A Punch Needle Finishing "Trick" (Tip) from Rose Clay at ThreeSheepStudio.com

By doing this, when you place the 
completed punch needle onto a piece of wool,
a book, a crock or a hornbook...
There will not be any Weavers Cloth
'peeking' out.


A Punch Needle Finishing "Trick" (Tip) from Rose Clay at ThreeSheepStudio.com

So, put away your sharpie and any other
'TRICKS'... only 'TREATS' here !!

Enjoy October my friends...
Rose

5 comments:

  1. Oh Rose, your work is just amazing. I'm usually not a huge fan of white pumpkins, but I absolutely love that piece. It has an elegant flare to it. Just beautiful! Thank you for the tip. These are the sorts of things that are truly gold nuggets after putting so much work into a project.
    Have a superb day my friend.

    ReplyDelete
  2. Thank you for the finish ideas.
    I learned about fabric glue on back if design before I take out if frame. Next morning its usually dry then I take out of frame and trim for the pillow Hornbooks or whatever the final finish will be.

    ReplyDelete
  3. Thank you for this tip !!!

    ReplyDelete
  4. Enjoyed making strawberries with the kit I bought at the Lititz Artisans Walk . Love all your pumpkin designs especially the patchwork one, would love to find time to do one of these . Thank you for a lovely blog .
    Louise

    ReplyDelete
  5. Hi Rose,
    Thank you sooo much for these tips and tricks. As always, your sharing is greatly appreciated.
    Warm Regards and Blessings,
    Barb

    ReplyDelete