If you missed the first two parts of this Series:
Let's finish our wool applique design
and review some helpful tips for working with wool.
and review some helpful tips for working with wool.
Select your floss colors. I like to match my floss to my wool colors. After gathering my colors I place them on a ring so I have them at hand.
Do not place wool in an embroidery hoop.
Wool has "stretch" and placing it in a hoop
will distort your work.
I use a hard surface to place my work on, laying the project flat from time to time to make sure my work is coming together nicely. This doesn't have to be anything fancy, I use a large thin book that is approximately 13in. x 10in. (33.02cm x 25.40cm) I have seen others use large clipboards or boards made specifically for this purpose.
Using 3 strands of embroidery floss in needle, begin blanket stitching the main "bottom or base" pieces first.
When using the Blanket stitch, pull snugly, but not so snugly that it distorts the fabric. Attempt for evenly spaced stitches. Knot when finished.


Continue blanket stitching the wool pieces into place,
working from the bottom pieces to the top pieces.
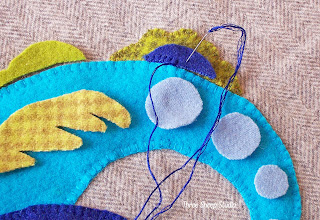
When one design piece rests against another design piece, always begin stitching on the side where the two pieces come together or meet, working your way around to the outer side of piece. When stitching a "base" piece, as pictured, if a "top" piece is in the way - pin it back, so that the bottom piece can be blanket stitched in place.
After bottom piece is blanket stitched in place,
unpin the top piece and continue with blanket stitching.
The circles will be completed in a Beaded Blanket Stitch.
A tutorial on the Beaded Blanket Stitch can be found here.
Your block is now complete !
Position wool face down on a thick towel, on a hard surface.
Lightly spritz wrong side with water and press lightly with iron
on a high heat setting.
ALWAYS keep iron moving, so as not to scorch wool.
(For remaining Series:
Part 1 and Part 2)
working from the bottom pieces to the top pieces.
When one design piece rests against another design piece, always begin stitching on the side where the two pieces come together or meet, working your way around to the outer side of piece. When stitching a "base" piece, as pictured, if a "top" piece is in the way - pin it back, so that the bottom piece can be blanket stitched in place.
After bottom piece is blanket stitched in place,
unpin the top piece and continue with blanket stitching.
The circles will be completed in a Beaded Blanket Stitch.
A tutorial on the Beaded Blanket Stitch can be found here.
Everyone likes to see the back of the project !
Here is mine - nothing special... ;)
Position wool face down on a thick towel, on a hard surface.
Lightly spritz wrong side with water and press lightly with iron
on a high heat setting.
ALWAYS keep iron moving, so as not to scorch wool.
(For remaining Series:
Part 1 and Part 2)


